
Creating visually striking and professional-quality images often requires more than just basic editing. One essential technique is photo merging—a powerful method that allows you to combine multiple images into a single, cohesive composition. Whether you’re aiming to correct imperfections, craft a panoramic view, or produce creative visual effects, mastering this skill can significantly elevate your content.
As digital content becomes increasingly competitive, the ability to merge photos effectively sets your work apart, especially in fields like photography, social media, and digital marketing. This guide offers a detailed walkthrough for merging photos on both Windows and Mac.
We’ll demonstrate using PhotoDirector, a highly versatile tool ideal for blending images seamlessly or stitching together panoramas, helping you bring your creative vision to life.
What Is Photo Merging?
Photo merging is an advanced editing technique that combines multiple images into a single, unified composition. It serves a wide range of creative and corrective purposes, from crafting artistic overlays to constructing panoramic views. The best method for photo merging depends on your project goals and visual style, whether you’re working with portraits, landscapes, or abstract compositions.
One of the most popular approaches is layer-based editing, where images are stacked and manipulated using various blending techniques. This method allows you to apply textures, merge contrasting scenes, or creatively transform your subject using overlays like cityscapes, nature elements, or patterns. Even images with different lighting or composition can be seamlessly combined using blending modes that merge pixel colors in visually striking ways.
PhotoDirector stands out by offering powerful layering tools, including gradient adjustments, customizable borders, and individual blending modes for each layer. You can even copy and save layer properties to streamline your workflow. Its built-in texture library enhances visual storytelling, enabling users to express mood or tone through overlays. Edits are saved in PhotoDirector Layer File format (.PHI), preserving every detail.
Additionally, photo merging includes panorama stitching—a technique perfect for capturing wide scenes without a wide-angle lens. PhotoDirector’s AI-powered panorama feature effortlessly compiles multiple overlapping shots into one seamless, high-resolution image, whether vertical or horizontal.
Read More: Top 8 Gender Swap Apps to Explore a Virtual You
Best Software to Merge Photos
PhotoDirector
PhotoDirector stands out as the top choice for merging photos, offering a robust set of editing tools for both Windows and Mac users. It’s a versatile and professional-grade photo editor that supports everything from basic adjustments to advanced compositing techniques.
With PhotoDirector, merging photos is seamless—whether you’re working with layer-based edits, blending modes, panorama stitching, or creating custom collages. The intuitive interface makes it accessible for beginners while still offering powerful capabilities for experienced editors. You can effortlessly overlay textures, align and blend images, and apply creative effects, all within a streamlined workflow.
Whether you’re enhancing portraits, crafting artistic visuals, or building panoramic landscapes, PhotoDirector delivers both precision and flexibility in one comprehensive package.
How to Merge Photos
Merging photos in CyberLink PhotoDirector is a straightforward process, thanks to its wide array of professional editing tools. The steps below will help guide your workflow, but don’t hesitate to explore different settings and effects to achieve the look that best suits your creative vision.
Start by downloading and installing PhotoDirector to unlock the full suite of features designed for seamless photo merging. Whether you’re combining layers, blending textures, or stitching panoramas, PhotoDirector provides the flexibility and control you need to create stunning, high-quality results.
Initial Steps
Access Your Imported Photos
Once the images are imported, they will appear under the “All Photos” and “Latest Imports” sections in the Smart Collection drop-down menu, making it easy to access and begin editing.
Download and Install PhotoDirector
Begin by downloading and installing PhotoDirector on your computer. After the download is complete, go to your browser’s download section and open the PhotoDirector file to start the installation process.
Launch PhotoDirector and Import Your Images
Once PhotoDirector is installed, open the software on your computer. Navigate to the Library tab in the top-left corner, then click the Import button located in the bottom-left corner of your screen.
Select Your Photos
From the Import drop-down menu, choose Photos to open your local storage directory. Select the images you want to use in your project and click “Open.”
Complete the Import Process
The Photo Import window will appear. Click the Import button in the bottom-right corner of the window to finalize the import.
Merge Photos with Layer Editing
After importing your images into PhotoDirector, you’re ready to start merging them using layer editing.
Erase Overlay Edges
If the edges of an overlay don’t blend well with the base image, you can refine them using the Eraser tool. Adjust the eraser’s size and opacity, and carefully erase any unwanted edges or regions from the overlay to ensure a smooth integration with the base image.
Open the Edit Tab
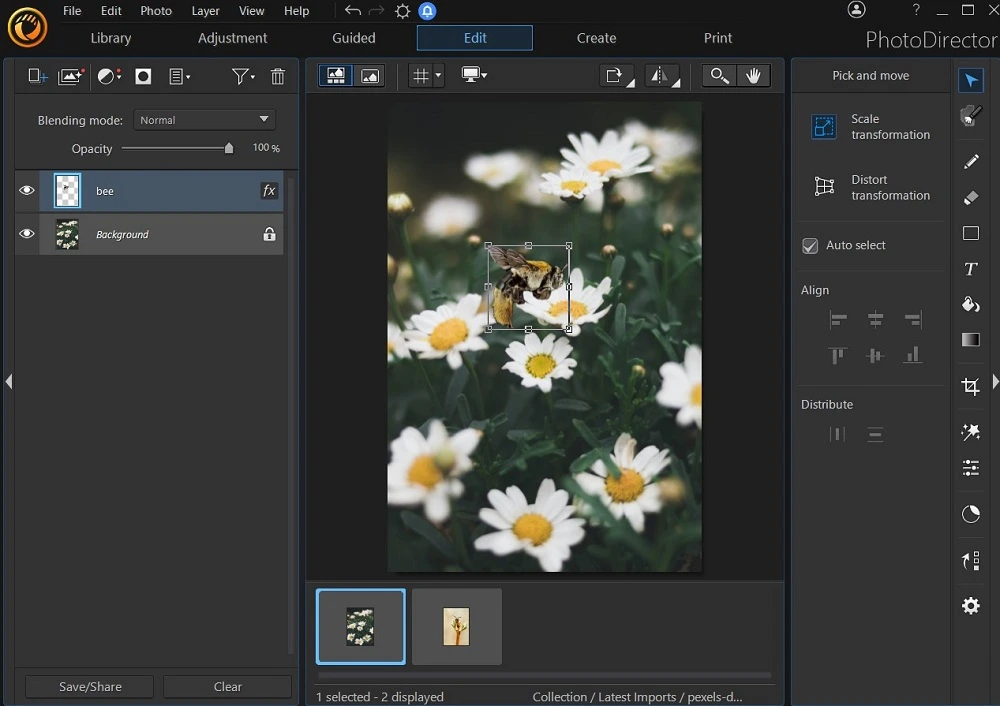
In PhotoDirector, layer editing is now located under the Edit tab. Click the Edit tab to access the editing platform. On the left side, you’ll find the layer controls, while the editing tools—such as Gradient, Fill, Text, and drawing brushes—are on the right.
Add the Base Image as the First Layer
Once the Edit tab is open, your imported images will be displayed below the preview screen. Select the image you want to use as your base layer, and simply drag and drop it onto the preview screen. The image thumbnail will appear on the left-hand window under the opacity adjustment slider.
Add the Overlay Image
To add an overlay image, choose the image from the bottom image scrollbar and drag it onto the base image in the preview screen. The overlay’s thumbnail will appear below the base image’s thumbnail in the left-hand window. The overlay will be positioned over the base image in the preview.
Repeat for Additional Overlays
Continue to add more overlay images by dragging and dropping them onto the preview screen. You can adjust the layering order by dragging the thumbnails in the left-hand window up or down to change the sequence of the layers.

Work on Layers Individually
To focus on a specific layer, PhotoDirector allows you to hide layers. Simply click the eye icon next to a layer’s thumbnail to hide it, and unhide it later to resume editing.
Remove Unwanted Elements from a Layer
If a layer includes unwanted elements, like a background or object, you can easily remove them. To do this, use the Area Selection Tool by clicking the brush icon at the top of the right-hand toolbar. If you want to remove a large section of one color, use the Magic Wand tool. Click on the area you want to remove, then use the Delete Selection tool to delete it. The removed area will become transparent, revealing the bottom layer.
Select Elements with the Smart Brush
To isolate a specific element in a layer, use the Smart Brush tool, especially useful if the background isn’t a uniform color. Adjust the size of the brush and add a feather effect around the edges. You can invert the selection to choose the subject or the background, and then click Delete Selection to remove the chosen part.
Resize and Reposition Elements
Once your images are in layers, you can adjust their size and position. Unlock an image for resizing by clicking the lock icon next to its thumbnail. Resize the image by dragging the nodes on the preview screen, and make precise adjustments by un-hiding all layers. Use the Pick and Move tool for repositioning, and the Scale and Distort Transformation options for further customizations.
How to Merge Photos with Blending Modes
Blending modes in PhotoDirector enhance layer editing by creating a visual connection between layers. With a wide range of modes to choose from, you can adjust the interaction between images to achieve various effects. Follow the steps below to merge your photos using blending modes.
Download and Install PhotoDirector
Start by downloading and installing PhotoDirector on your computer. Once installed, import the images you want to combine and follow the steps outlined earlier for importing and preparing your images.
Adjust Each Overlay’s Opacity
If your project requires some layers to be more transparent, adjust the opacity of each overlay to allow elements of the base layer to show through. Click on the relevant image thumbnail and use the slider below the Blending Mode drop-down menu to adjust its opacity. This step may need to be revisited after applying the blending mode.
Apply a Blending Mode to the Layers
To apply a blending mode, click on the Blending Mode drop-down menu located in the top left of the screen. From the list, choose the blending mode that suits your project.
Readjust the Layers’ Opacity
After applying a blending mode, revisit the opacity adjustments if needed. Some blending modes may create transparency, requiring you to fine-tune the opacity using the slider to achieve the desired effect.

Create the Merged Image
Once you’re satisfied with the layers and the blending mode, it’s time to merge the image. Open the Layer Manager drop-down menu and select Merge All. This will combine all the layers into a single image.
- The photo thumbnails on the left will disappear, and the merged image will appear in the preview window.
- At this point, you can continue to refine and enhance your newly merged image using other PhotoDirector tools.
Save Your Project
After merging your photos, you can save the final image to your local storage. Click on File and select Export Project. Choose the destination for the saved image. If you wish to share your image online, hover over Share Selected Photos On to quickly upload it to your chosen platform.
By using blending modes, you can creatively merge photos and achieve striking visual effects that make your images truly unique.
How to Merge Photos into a Panoramic Image
Creating a panoramic image from multiple photos of a landscape or cityscape is easy with PhotoDirector. The software’s AI-powered tool stitches the images together, eliminating the need for manual alignment. Follow these steps to create a stunning panorama:
Import the Images
Start by importing the images of the same scene into PhotoDirector from your local storage. After importing, they will appear in the Latest Imports folder and the browser panel at the bottom of the screen.
Access the Panorama Feature
Click on the Edit tab, then select Panorama from the Photo Merge drop-down menu to access the panorama tools.

Add Your Images
Highlight the images in the browser panel below the preview screen. Drag and drop these images into the preview screen using your mouse cursor. If you’ve selected all images, simply drag them in a single motion. Alternatively, double-click to add them directly to the workspace.
Merge the Images into a Panorama
Once your images are added to the preview screen, click the Merge button below the image thumbnails. PhotoDirector’s AI tool will automatically stitch the images together, forming a seamless panoramic view.
Crop the Panorama Image
After merging, the resulting panorama may need some cropping, especially if the image files were not the same size. Thin black edges may appear where the frames didn’t align perfectly. You can crop these edges easily by using the cropping nodes around the image, which appear by default.
Use the Autofill Boundary Tool
If you prefer not to crop the image, you can use the Autofill Boundary tool. Check the box to the left of the preview screen, and PhotoDirector will automatically fill the black edges by analyzing the surrounding image content. This tool works particularly well when the edge areas have a monochromatic color scheme, producing a clean, continuous look.
By following these steps, you can effortlessly merge multiple photos into one panoramic masterpiece, perfect for showcasing wide, scenic views.
Download the Best Photo Merging Software for Free
PhotoDirector is a top-tier photo editing and management program, offering an intuitive user experience for editors of all skill levels. Whether you’re looking to create photo layers, collages, or panoramas, PhotoDirector provides the tools you need to seamlessly merge images and craft professional content.
In addition to photo merging, PhotoDirector boasts a wide array of advanced editing and enhancement features. These include high-quality effects, intelligent corrections, and professional retouching tools that allow you to fix imperfections. You can fine-tune mid-tones, shadows, and highlights, while also having full control over essential properties like hue, saturation, and lighting. PhotoDirector further offers creative features like animations and AI-driven functions such as sky replacement and fast masking.
Frequently Asked Questions
What is Photo Merging?
Photo merging is the process of combining multiple images into one cohesive photo. This technique allows you to create stunning visuals, whether through layer editing, panoramic stitching, or artistic collages. The method you choose depends on your project’s needs.
How do I merge photos using PhotoDirector?
To merge photos in PhotoDirector, import your images into the program, choose the editing method (like layer editing, blending modes, or panorama creation), adjust the opacity and layers, and apply the desired effects. You can also use the AI-powered panorama tool to automatically stitch images together.
What are blending modes, and how do they work in PhotoDirector?
Blending modes in PhotoDirector control how images or layers interact with each other. By using blending modes, you can create various visual effects such as darkening, lightening, or contrasting layers. These modes give your photos a more unique and professional touch.
Can I create a panorama with PhotoDirector?
Yes! PhotoDirector offers an AI-driven tool that automatically stitches multiple images of the same scene into a panoramic photo. Simply import your images, select the panorama option, and let the software do the rest. You can also crop or use the Autofill Boundary tool to finalize your panorama.
Is PhotoDirector easy to use for beginners?
Yes, PhotoDirector is designed for users of all skill levels, with an intuitive interface and step-by-step guides. Whether you’re a beginner or an advanced editor, you’ll find tools and features that are easy to navigate and enhance your photos effectively.
Can I use PhotoDirector to remove backgrounds or objects from images?
Yes! PhotoDirector has several tools, such as the Magic Wand and Smart Brush, to help you remove backgrounds or unwanted elements from your images. You can easily isolate subjects and refine them for a cleaner and more professional look.
Is PhotoDirector available for both Windows and Mac?
Yes, PhotoDirector is compatible with both Windows and Mac systems, allowing users across different platforms to enjoy its powerful photo editing capabilities.
Conclusion
Photo merging is a powerful photo editing technique that allows you to create stunning visuals by combining multiple images into one cohesive masterpiece. With tools like layer editing, blending modes, and panorama stitching, PhotoDirector provides everything you need to enhance your photos and bring your creative ideas to life. Whether you’re a beginner or an advanced user, PhotoDirector’s intuitive interface and professional features make it easy to merge, edit, and fine-tune your images.
From removing unwanted elements to creating seamless panoramas, PhotoDirector empowers you to transform your photos into works of art. Download PhotoDirector today and start exploring the endless possibilities for photo merging and editing. Whether for personal projects or professional work, this software offers the flexibility and power you need to take your photo editing to the next level.